
Opening a small bakery shop is about more than just baking exceptional bread and pastries, it’s about creating a space where customers want to linger, buy, and return. Your interior design sets the tone for the entire customer experience, from the moment they walk through the door to the moment they leave with a warm croissant in hand. Whether you’re launching a new bakery or refreshing an existing one, thoughtful design choices in color, lighting, layout, and materials can transform a modest space into a thriving neighborhood destination. This guide covers seven practical design ideas proven to boost both ambiance and sales in small bakery environments.
Key Takeaways
- Warm, neutral color palettes with soft accent walls make small bakery shop interior design feel inviting and spacious while showcasing baked goods without overwhelming the senses.
- Layered lighting using warm LED fixtures (2700K–3000K) at 50–75 foot-candles creates an appetizing glow and highlights products, directly boosting customer appeal and sales.
- An L-shaped or U-shaped counter layout with strategic positioning maximizes serving length and employee efficiency, reducing wait times and improving the customer experience.
- Open shelving positioned at eye level (48–60 inches) creates visual abundance and builds customer trust by displaying products prominently without blocking sightlines.
- Durable, slip-resistant flooring like polished concrete or large-format ceramic tiles combined with non-slip coatings ensures both safety and easy maintenance in high-moisture bakery environments.
- Strategic use of refrigerated display cases and clear glass showcases, combined with thoughtful product grouping and signage, transforms small spaces into curated shopping destinations that encourage repeat visits.
Create A Warm, Inviting Color Palette
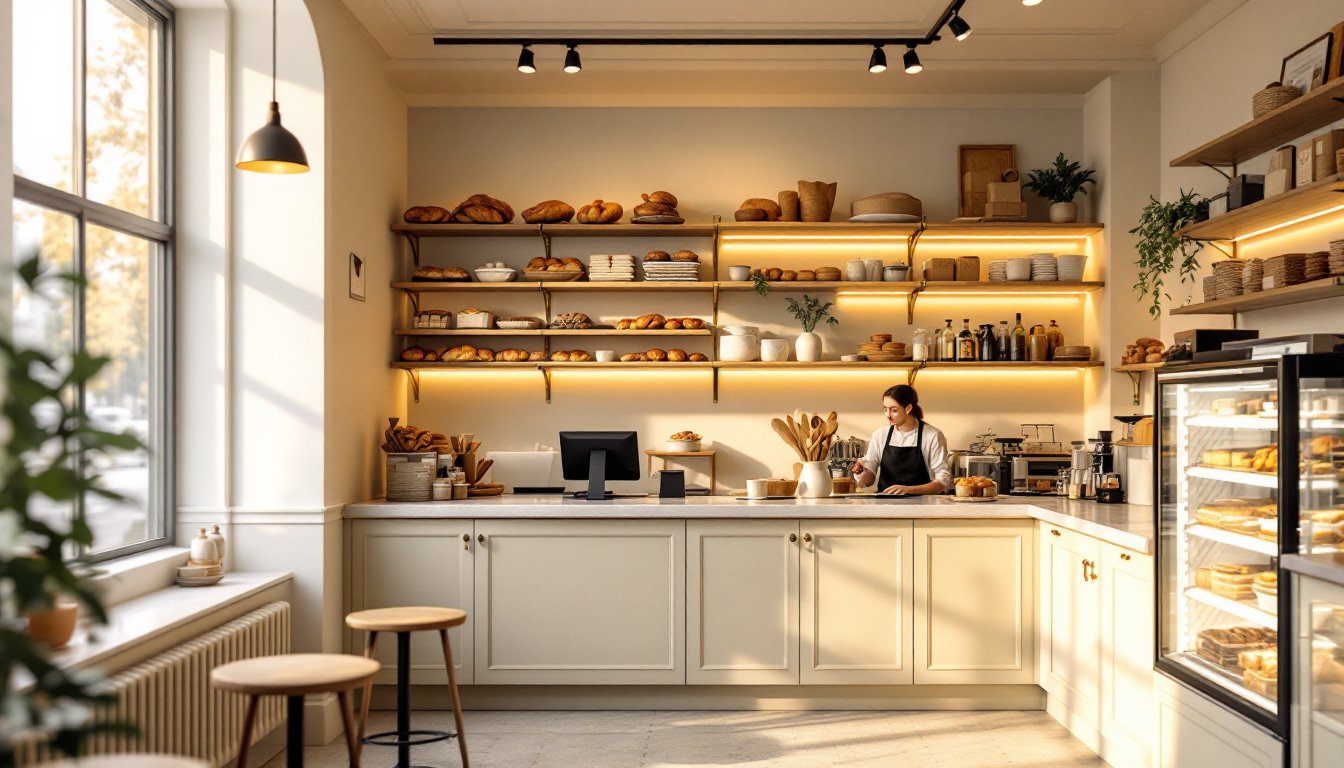
Color sets the emotional tone before customers even smell the fresh bread. Warm, neutral palettes, creams, warm whites, soft grays, and muted taupes, work best in tight quarters because they make spaces feel larger and cleaner while highlighting your baked goods. Accent walls in soft pastels (pale sage, warm blush, or butter yellow) add personality without overwhelming the eye. Avoid cool grays and blues: they can make a small space feel cold and institutional, which is the opposite of what a bakery should feel like.
Consider your brand identity when choosing color. A rustic farmhouse bakery might lean into terracotta or natural wood tones, while a modern minimalist shop might use crisp whites with black accents. Paint quality matters, invest in a commercial-grade eggshell or satin finish that withstands humidity and daily cleaning. Bakeries generate moisture and heat: budget-grade paint will peel and discolor quickly. If you’re not sure about commitment, textured wallpaper or removable wall finishes give flexibility without permanent paint.
Maximize Visual Impact With Strategic Lighting
Lighting makes or breaks a bakery’s appeal. Poor lighting hides the beauty of your products and makes the space feel dungy. You need layered lighting: ambient (general), task (counter and display areas), and accent (to highlight featured items).
Ambient lighting should be bright but warm. Recessed LED fixtures rated 2700K to 3000K (warm white) are industry standard for food retail, they’re energy-efficient, durable, and create an appetizing glow without harsh shadows. Aim for 50-75 foot-candles of light in the main sales area. Task lighting over the counter and register keeps employees safe and speeds transactions. Accent lighting (track lights or spotlights) should illuminate your display cases and featured items, drawing the eye and making products pop.
Natural light is a bonus if your space has windows, it builds customer confidence in product freshness and creates an open feeling. Skylights or clerestory windows work in layouts where side windows aren’t available. Avoid recessed lights directly over display cases: they cast shadows on products. Instead, position them slightly forward or use angled track lighting at 45 degrees.
Design An Efficient Counter Layout
Your counter is the operational heart of the bakery, it’s where transactions happen, staff move, and customers form their first impression. Layout determines traffic flow, employee efficiency, and perceived value. A poorly designed counter slows lines, frustrates staff, and feels cramped to customers.
Standard bakery counter depth is 24 to 30 inches, with a surface height of 36 inches (standard countertop) or 42 inches (tall counter for register and display). The L-shaped or U-shaped layout works best for small spaces because it maximizes linear serving length and allows one or two staff members to serve customers and manage the register without colliding. Position the register at the corner or at the end of the counter, not in the middle, this keeps the line-of-sight clear and lets staff monitor the shop.
Counter material should be food-safe, durable, and easy to sanitize. Quartz or solid surface materials (like Corian) are bakery favorites because they resist staining, don’t harbor bacteria like laminate can, and look professional. Wood is warm but requires regular sealing and care in a humid environment. Avoid dark counters, they show flour dust and smudges constantly. If you’re installing a new counter, account for cabinetry (typically 18 inches deep beneath the work surface) and electrical outlets for registers, scales, and small appliances.
Incorporate Open Shelving and Display Elements
Open shelving draws the eye upward in tight spaces and creates a sense of abundance. Unlike tall cabinetry that blocks sightlines, open shelves let customers see products, building appetite and trust. Wood shelving with a light stain or white finish pairs well with most bakery aesthetics. Metal shelving brackets (black or brass) add an industrial or upscale touch depending on the finish.
Shelving depth should match your products: 10 to 12 inches works for most baked goods and packaged items, but bread displays might need 14 inches. Space shelves 12 to 14 inches apart vertically, enough for layer cakes and bread loaves but not so much that the shelf feels empty. Install shelving at eye level (48 to 60 inches from the floor) where customers naturally look. Avoid shelving above 70 inches unless it’s purely decorative: customers won’t engage with products they have to crane their necks to see.
Use shelving to tell a story. Group products by type (artisan breads, pastries, seasonal items) rather than scattered display. Rotate stock regularly, nothing kills sales like stale-looking display. Add small signage with product names, origins, or ingredients: small space living ideas often highlight how thoughtful labeling creates an intentional, curated feel.
Bakery Case and Product Showcase
A refrigerated display case is non-negotiable for croissants, sandwich fillings, cream pies, and perishables. Position it prominently, usually at the front counter or center of the shop where customers see it immediately. Cases with internal LED lighting (integrated, not added on) look professional and make products irresistible. Standard case widths are 36, 48, or 60 inches: choose based on your shop footprint and product volume. Avoid oversized cases in tiny shops, they dominate the visual space and look wasteful if not fully stocked.
Non-refrigerated product cases (for cookies, brownies, packaged goods) work beautifully on open shelving or in vintage-style glass cases (think farmhouse bakery vibes). Clear glass lets product speak for itself. Line cases with parchment or kraft paper, it adds softness and makes items visually pop against a neutral background.
Choose Durable, Easy-Clean Flooring
Bakery floors take a beating: flour dust, water, dropped items, and constant foot traffic. Your flooring must be slip-resistant, easy to clean, and durable enough to last years without replacement.
Polished concrete is the industry standard, it’s affordable, professional-looking, durable, and easy to mop. Seal it to prevent staining and add a non-slip coating in high-traffic zones. Ceramic or porcelain tile (12×12 inches or larger) is another solid choice: large tiles have fewer grout lines to trap flour and bacteria. Use matte or textured finishes, not high-gloss, glossy floors are slippery when wet, a serious safety hazard in a food environment. Avoid wood or laminate: they absorb moisture and warp in bakery humidity.
Color matters more than aesthetics, light neutral tones (grays, light tans) hide flour but show every footprint: dark tones hide mess but show spills and dust. Mid-tone grays or warm concrete finishes strike a balance. Budget for a commercial-grade sealant and non-slip coating, especially in the counter area where staff moves quickly. These aren’t cosmetic: they’re safety investments. A slippery floor in a bakery is a liability issue and a reason customers won’t return.
Conclusion
Small bakery design succeeds when it balances warmth with efficiency. A thoughtful color palette, strategic lighting, smart counter layout, visible product displays, and practical flooring create an environment where customers linger, buy more, and come back. These design choices aren’t decorative afterthoughts, they’re operational decisions that affect daily workflow, brand perception, and revenue. Start with the elements that matter most to your operation (counter and lighting, typically), then layer in refinements as budget allows. Your shop’s interior should reflect the care you put into your baking.